
Hardware Accelerated Plex Transcoding with consumer GPUs in Dell Servers
One of my recent projects was to improve my Plex media streaming experience by figuring out how to install a consumer graphics card into the Dell server I built a few years ago. The main problem I was facing was being able to watch any sort of 4k videos on devices which only viewed content at 1080p, or being away from home with a slow internet connection that couldn’t stream the high bitrates of 4k content. When these situations occurred, the Dell server’s CPU would kick in to transcode the 4k content down into a lower resolution for streaming. Most of the time, the CPU would start struggling to transcode the video at a fast enough rate, causing constant buffering of the video. All 24 of the CPU’s cores would be maxed out, but that’s still not enough for modern video codecs and bitrates.
The solution was simple enough in theory. Get a graphics card, install it into the server, and configure Plex to use it. Should be a pretty quick process, right? It took me a few weeks to source the right parts, some crafty work, and lots of research to make sure I was doing things right, and not blow the server up. More on that last part later. Make sure you have Plex Pass if you’re following along.
Initial graphics card
I had a few graphics cards lying around, so why not try those in the server? Pop the latest one in and discover that it won’t actually speed up video transcoding. It turns out that to be able to support video transcoding, specifically encoding and decoding of video, a pretty recent (in the last several years) graphics card needs to be used. A great reference that everyone uses for graphics card compatibility for Plex transcoding is this Nvidia page. For Nvidia graphics cards, Plex needs the card to support the nvenc (encoding) and nvdec (decoding) functionality for the specific video codecs of your content. I don’t have firsthand experience with AMD graphics cards, but imagine they follow a similar path as I went through.
Most of the video content these days is encoded as either h.264 (AVC) or the newer h.265 (HEVC) codecs. Plex can tell you which codec your videos are using. Not common at all yet, but a successor of h.265 is AV1, which is only supported on some of the latest graphics cards. It will be years before content starts showing up as AV1, and even longer for the mass majority of content defaulting to AV1. We’re still split between mostly h.264 with an increasing amount of content showing up as h.265 now.
Looking up the graphics card that I had in Nvidia’s compatibility matrix, it was clear that it was too old and didn’t support any of the necessary encoding and decoding of h.264 and h.265 videos. Time to find a card that would suffice, and not break the bank.
GTX 1660 Ti
From looking at the compatibility matrix, the Geforce GTX 1660 Ti stood out to me as a good balance of power usage, compatibility for both nvenc and nvdec for h.264 and h.265, and a relatively low price on Facebook Marketplace of $140. This card does require extra power from a 8-pin pci-e power cable, but the Dell server looks to have one of those available. I also looked into an RTX 4060 or newer for future-proofing with AV1 codec support, but they’re still quite pricey even on the aftermarket. GTX 1660 Ti it is. I didn’t even bother looking into buying a Nvidia Quadro graphics card, but some of them do show up for sale on secondhand marketplaces. They should work as well.
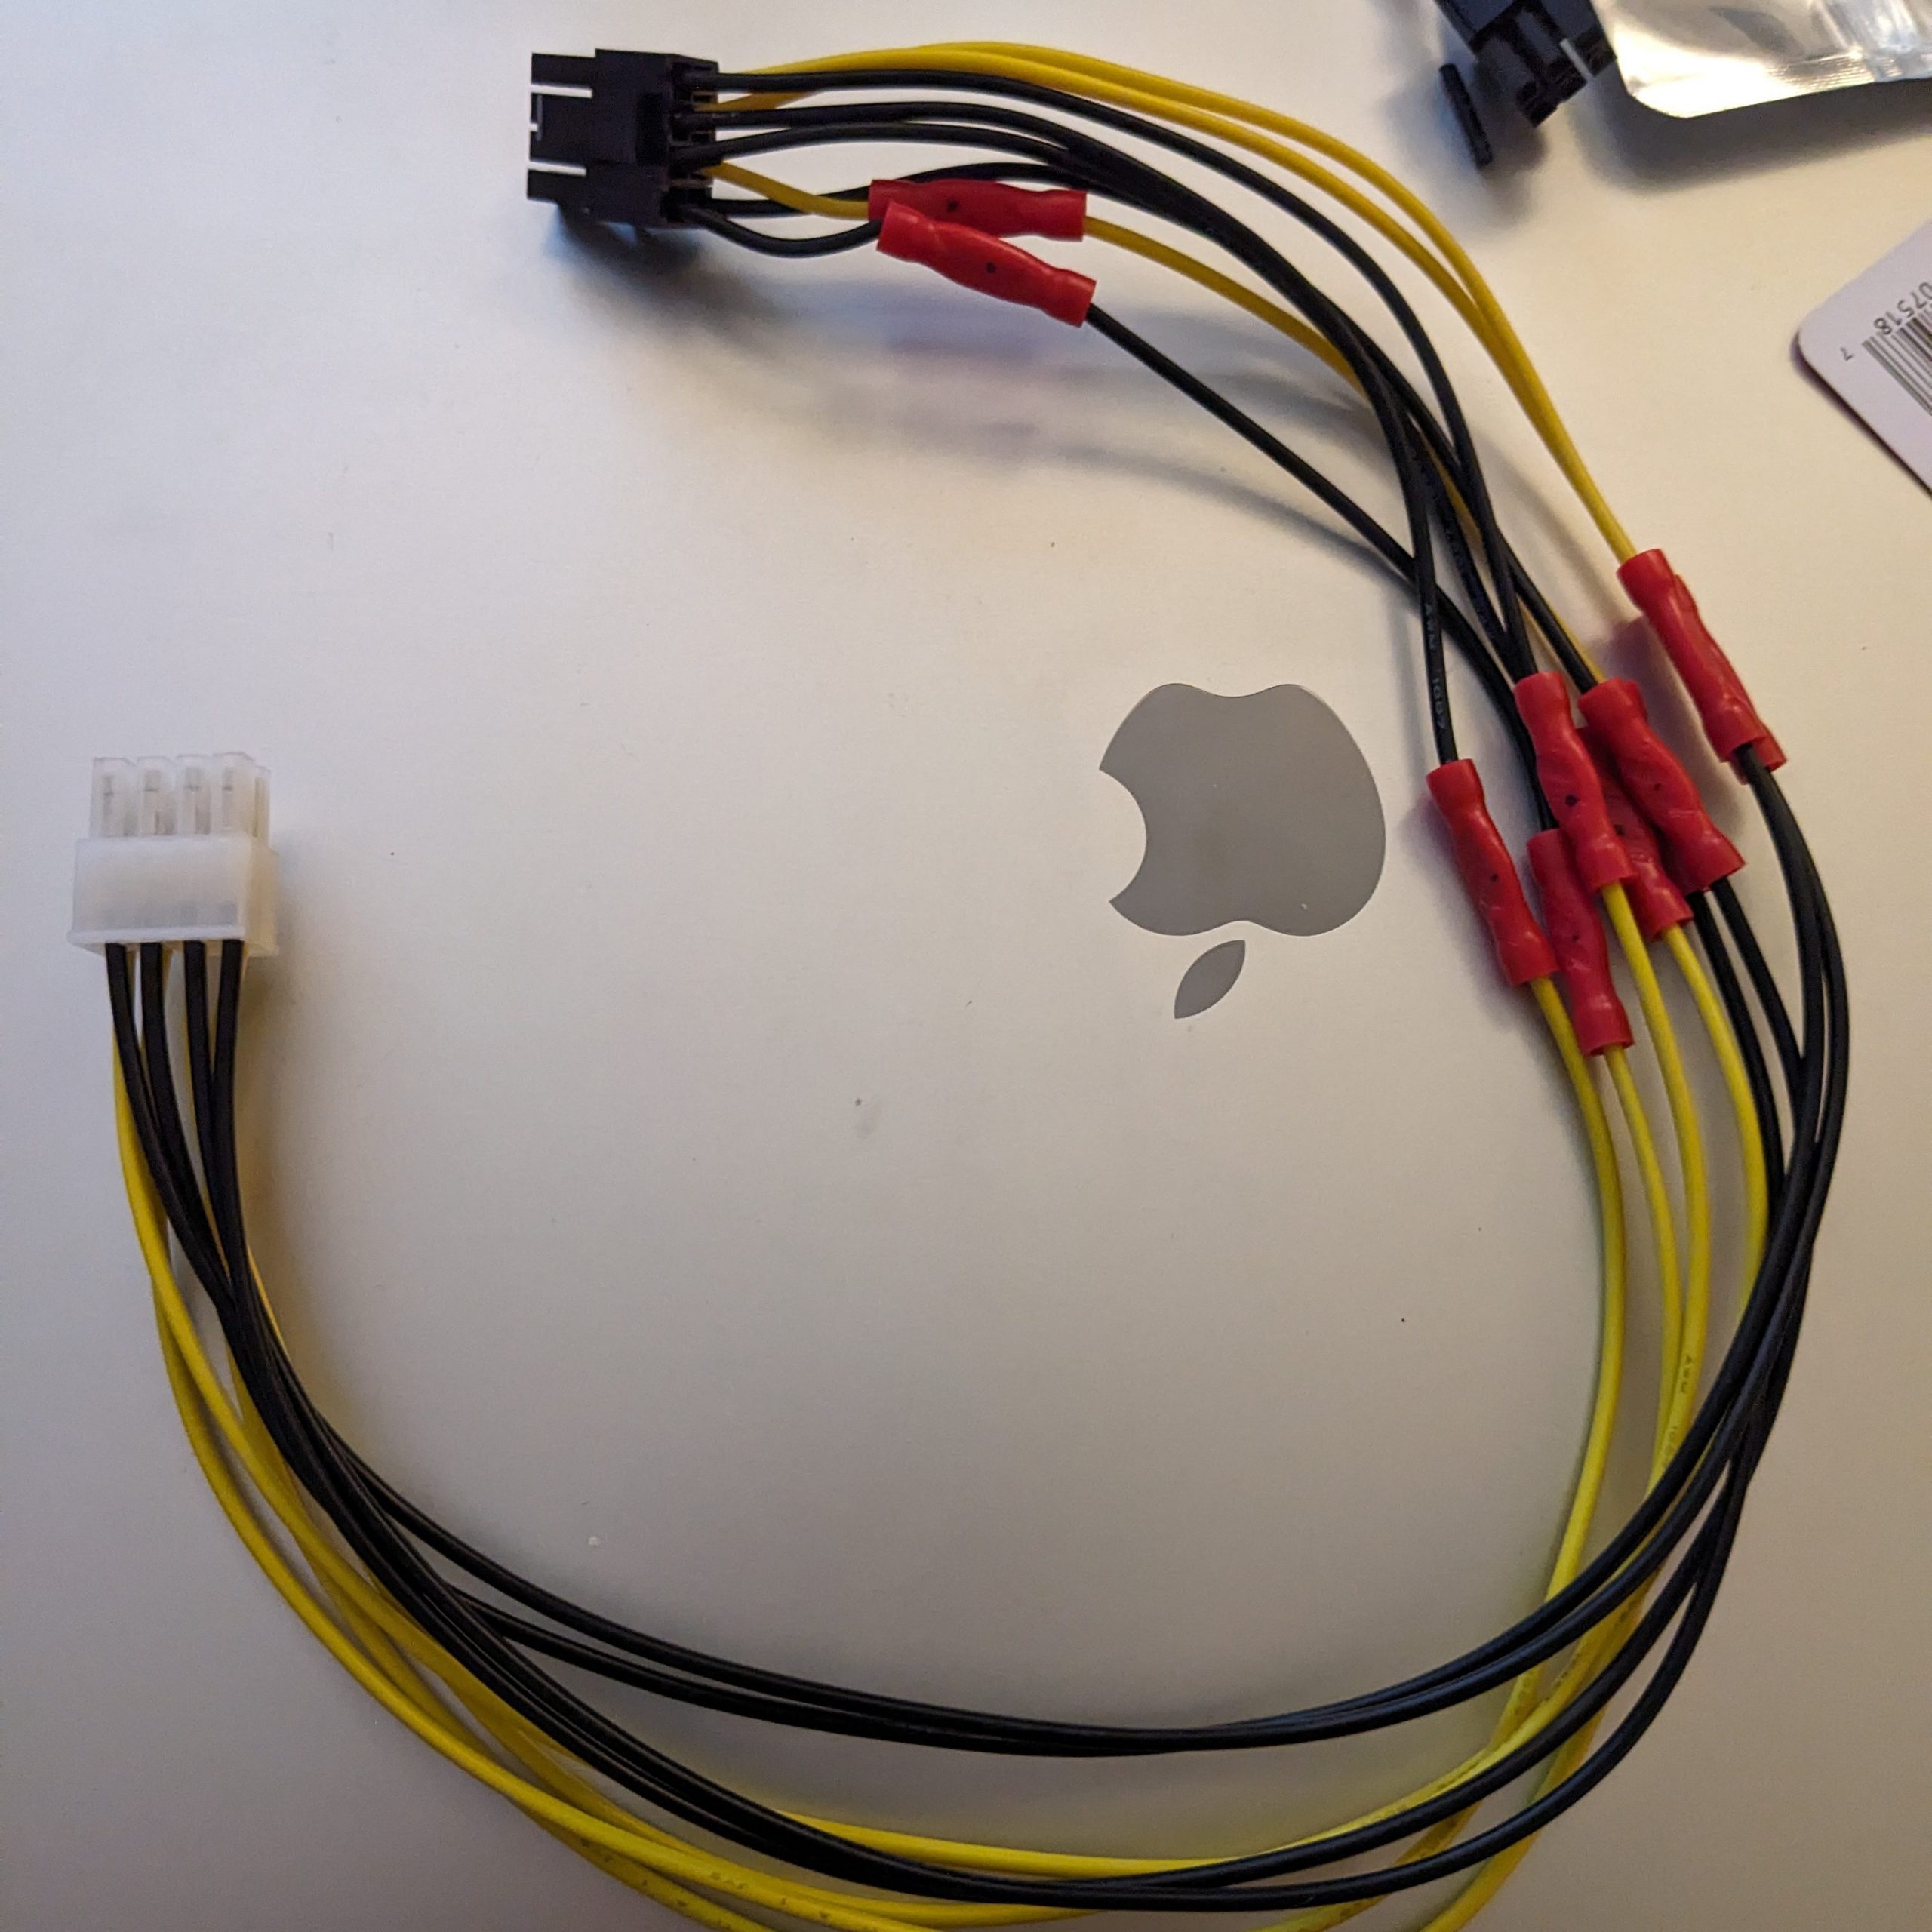
 Immediately after getting the card I had to figure out how to connect the 8-pin female port on the server’s power supply to the 8-pin female port on the graphics card. Usually in consumer desktop hardware, the power supply would already have a free 8-pin cable available, making this process of plugging the graphics card in very easy. The server didn’t have this extra cable available. It was either buy a male to male 8-pin cable off Amazon or Ebay and wait for it to arrive weeks later, or fudge something together by hand. I chose the latter as this was faster, and how hard could it be, right?
I soon discovered a part of the internet where people were discussing powering GPUs in desktops, powering GPUs in servers, people frying their hardware, similar but incompatible 8-pin power standards, what are these “sense” pins, and more. This quickly brought up the seriousness of what I was getting in to. I don’t want to damage any of my hardware if I use the wrong cable or provide too much power to the video card.
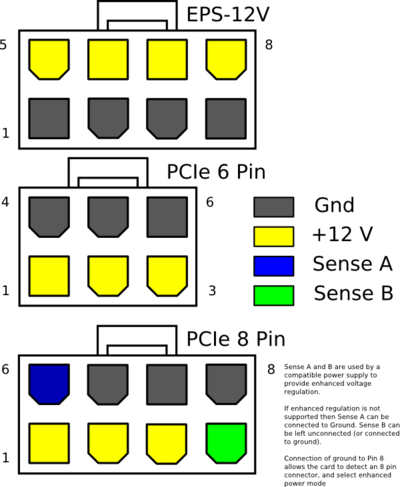 After some reading, I discovered that there’s two very similar looking 8-pin power connectors for hardware inside of computers. There’s the pci-e 8-pin standard which is widely used for graphics cards. It has three wires that run 12v, and the rest are all ground. Then there’s the other 8-pin standard called EPS-12v which looks incredibly similar, but has four 12v wires and four ground wires. It would be bad to connect a pci-e 8-pin port to a EPS-12v port – you’ll damage some hardware that way.
After more reading, I found someone doing something similar in a newer generation Dell server than mine. Their experience and concern brought up the fact that some servers can provide an 8-pin power port for graphics cards, but use a different layout of which pins provide power and which provide ground. There’s no closure to how it went for them, but this gave me the idea to follow in their steps and use a multimeter to inspect what voltages are actually going through each of those pins. This would influence my next steps of whether building a custom cable would work for my use case.
The goal was to determine the voltages coming out of the server’s EPS-12v connector’s pins. I familiarized myself with using a multimeter from a few different articles and videos, and trying out what I’ll be doing on the server with a spare PC, as I didn’t have much experience with electronics at this level. I also didn’t want to break anything in the process. After experimenting with checking the voltages on the spare computer’s 8-pin pci-e cable, I felt confident enough to inspect the server. I ended up with some surprising but useful results.
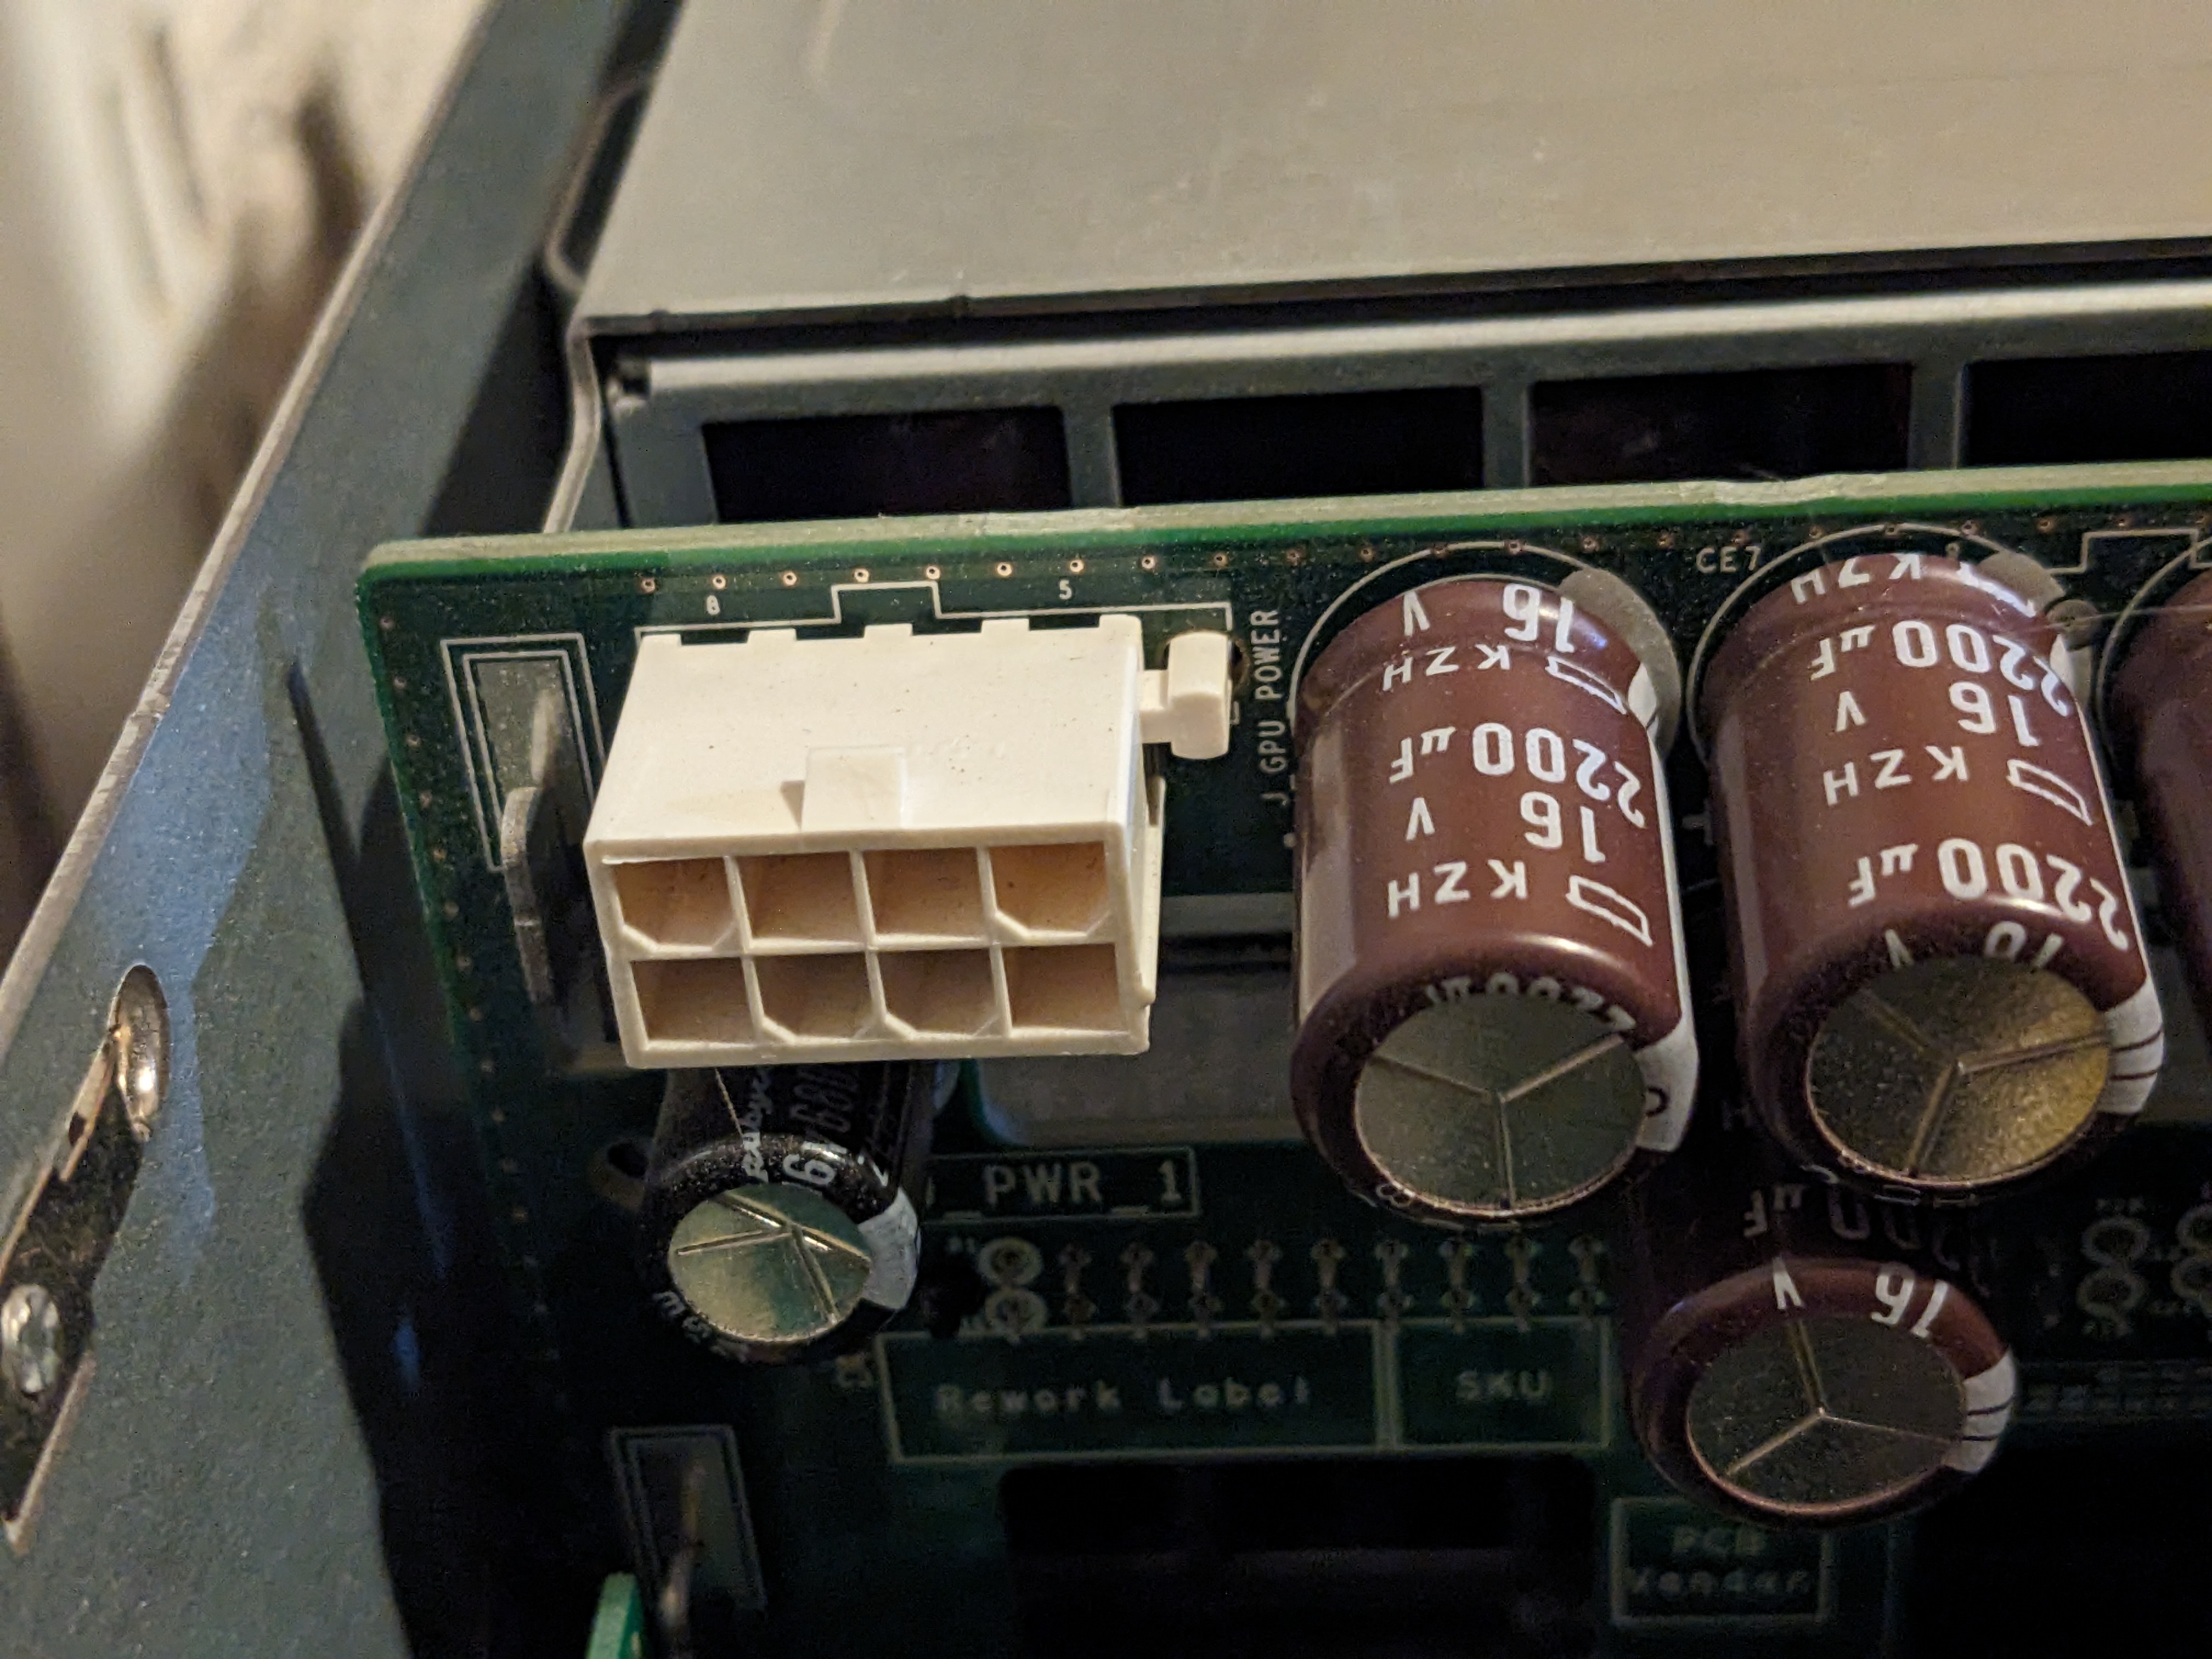
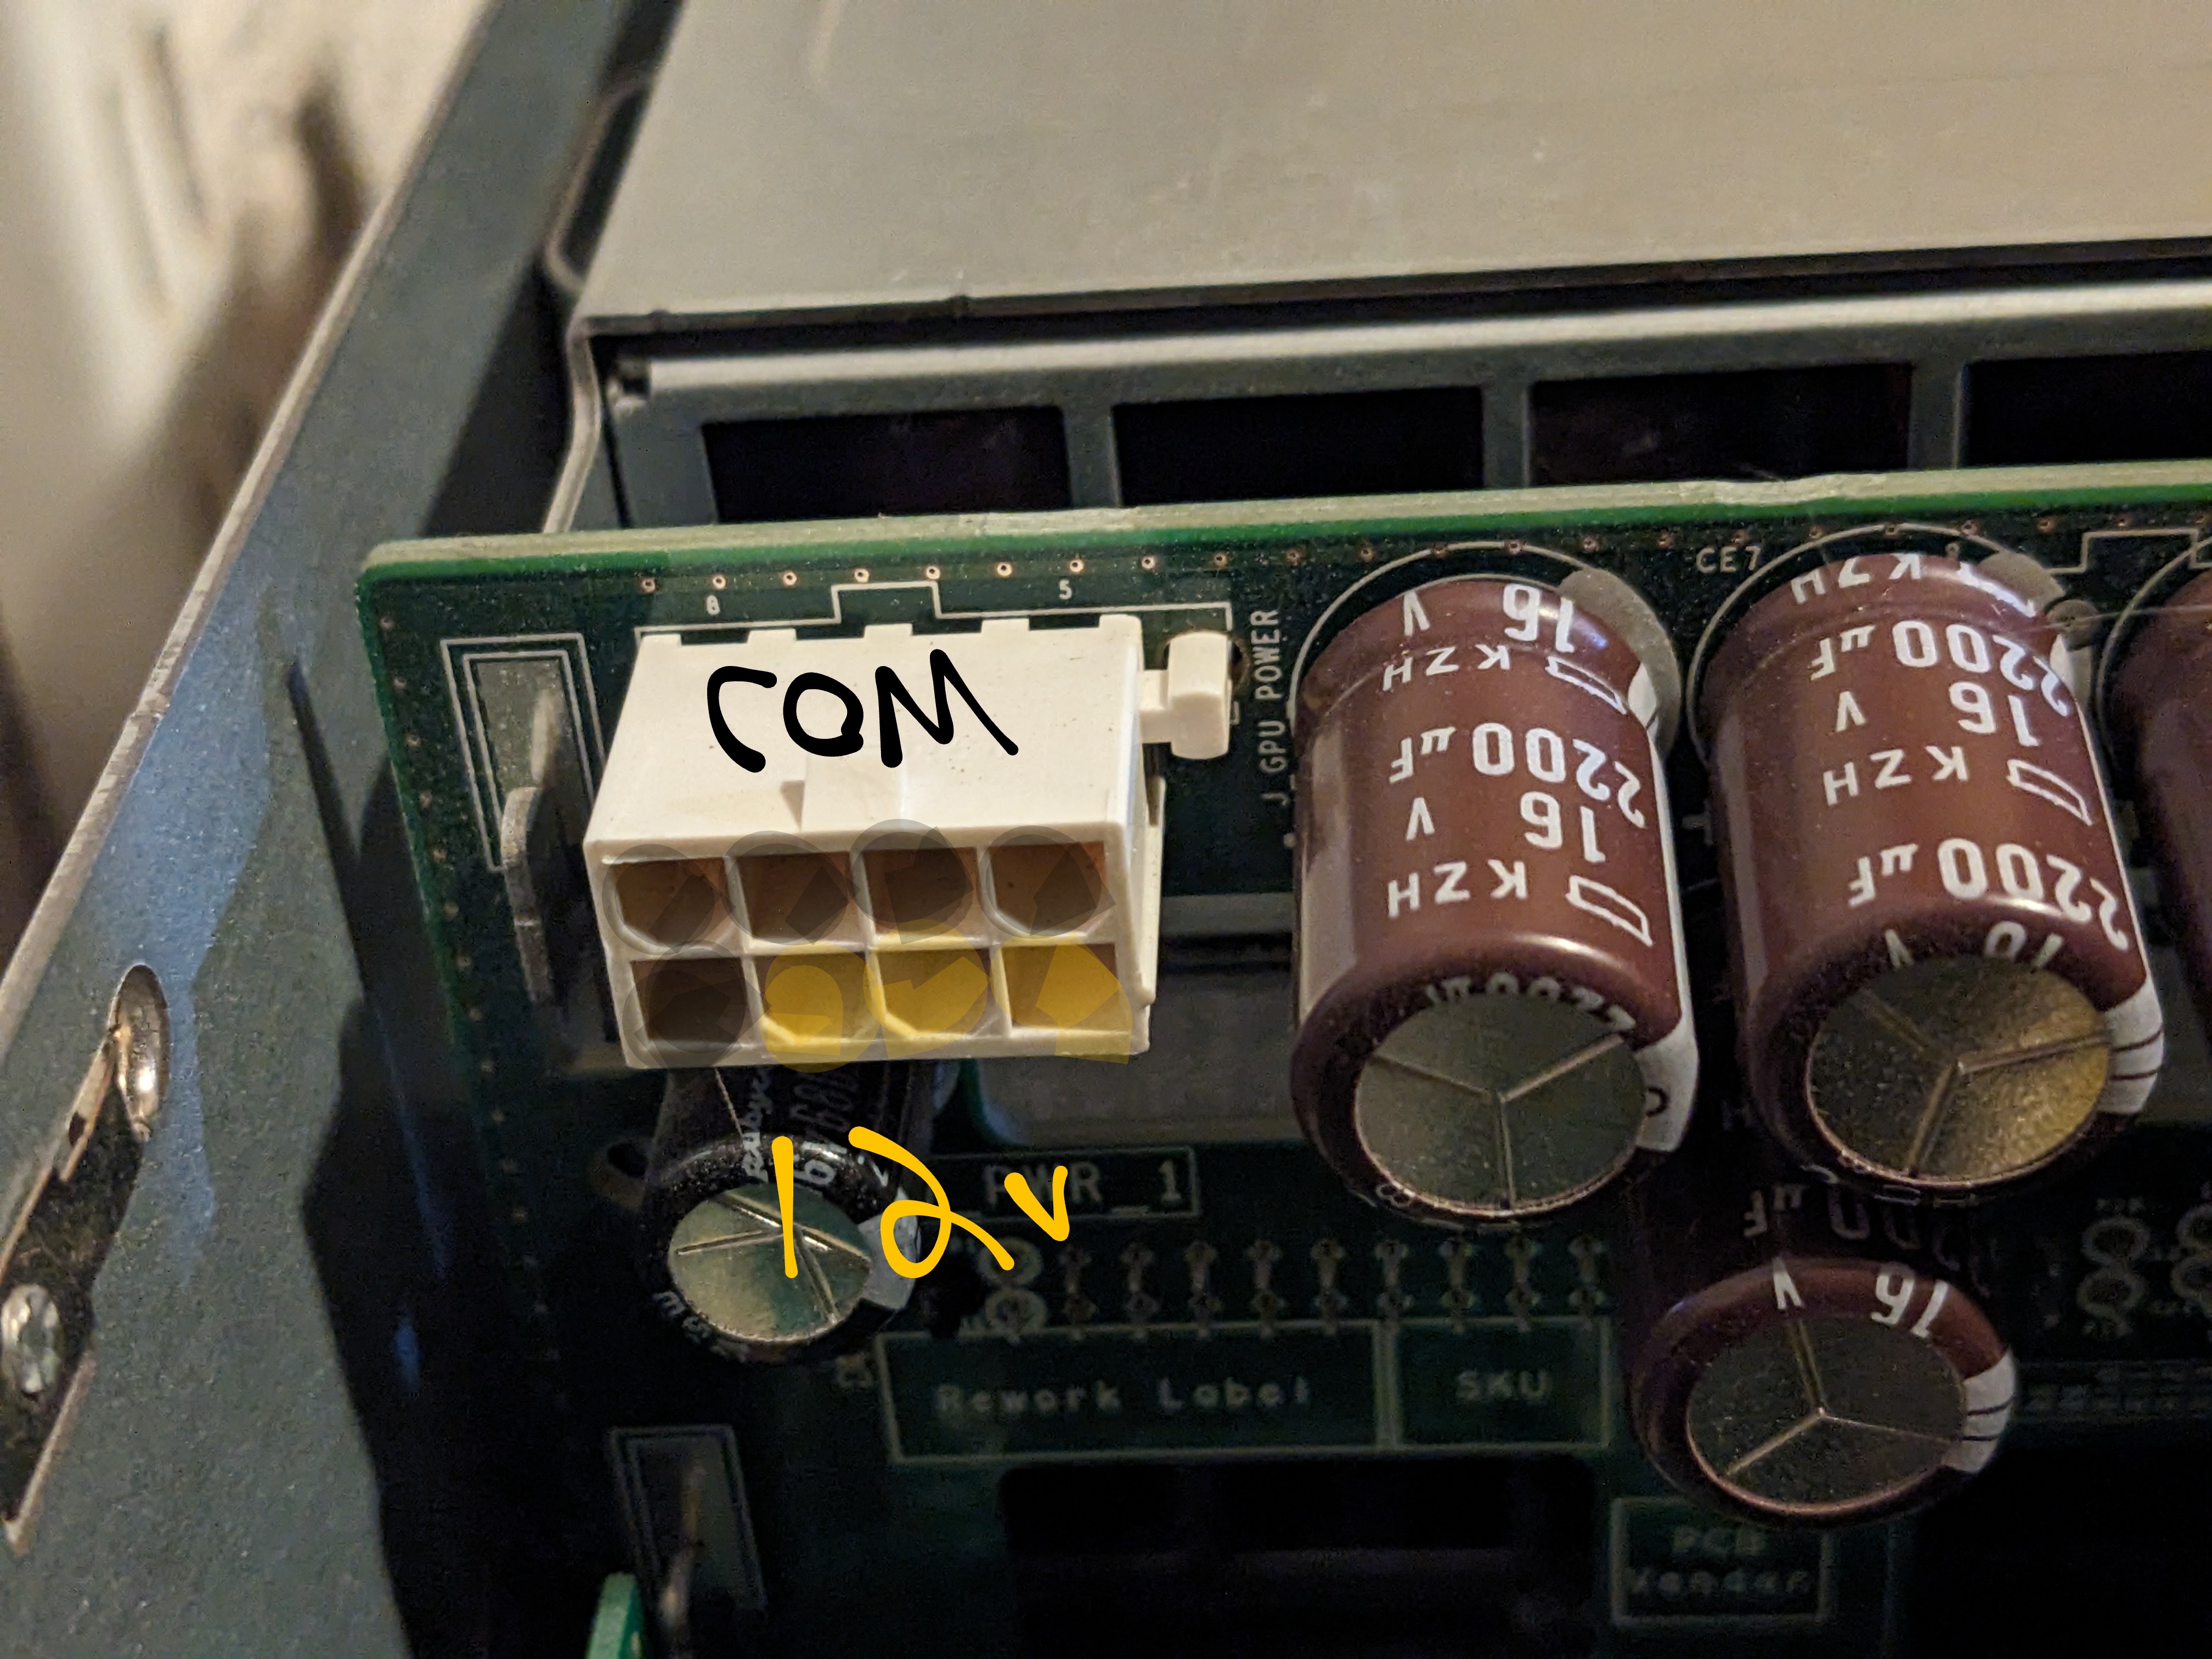 It turned out that the Dell server has a EPS-12v connector. Written beside it on the circuit board is GPU POWER, leading me to believe it should work for GPUs. When checking the pins, instead of four 12v pins, there was actually three 12v pins – similar to 8-pin pci-e. This was a big warning that plugging anything into this port should be done with lots of consideration as this isn’t actually a EPS-12v power connector! It’s a pci-e 8-pin in disguise.
At this point, it was clear that there was the right number of 12v wires and ground wires for a graphics card to theoretically work in this server. I bought a few pci-e 8-pin cable extenders that would fit into the server’s EPS-12v port and graphic card’s pci-e port. What I needed to do was splice the female-to-male cables into a male-to-male cable, with the 12v and ground pins in the right orientation. This required a lot of patience and triple checking that the right wires were in the right orientation. I only had one shot at this, as failure would potentially fry parts of the server.
Another multimeter trick I picked up was testing the continuity of a wire – basically can electricity flow from one end of the wire to another. This helped with verifying that my splicing of the power cable with butt splice connectors was solid, and that there weren’t any wires somehow crossing each other.
 Once I was confident enough with my custom cable creation, it was time to proceed with the riskiest part: install the GPU and its custom power cable into the server. I found an afternoon to take the server offline, remove all the hard drives in case of electrical failure, plug the new cable in, test the voltages again, and plug the graphics card in. I monitored the server’s vitals and boot-up via the iDRAC remote management interface from my laptop. It started up and worked like a charm. As the stress and tension of massive hardware failure departed, it was time to move on to putting the server back together and moving over to the OS configuration side of things.
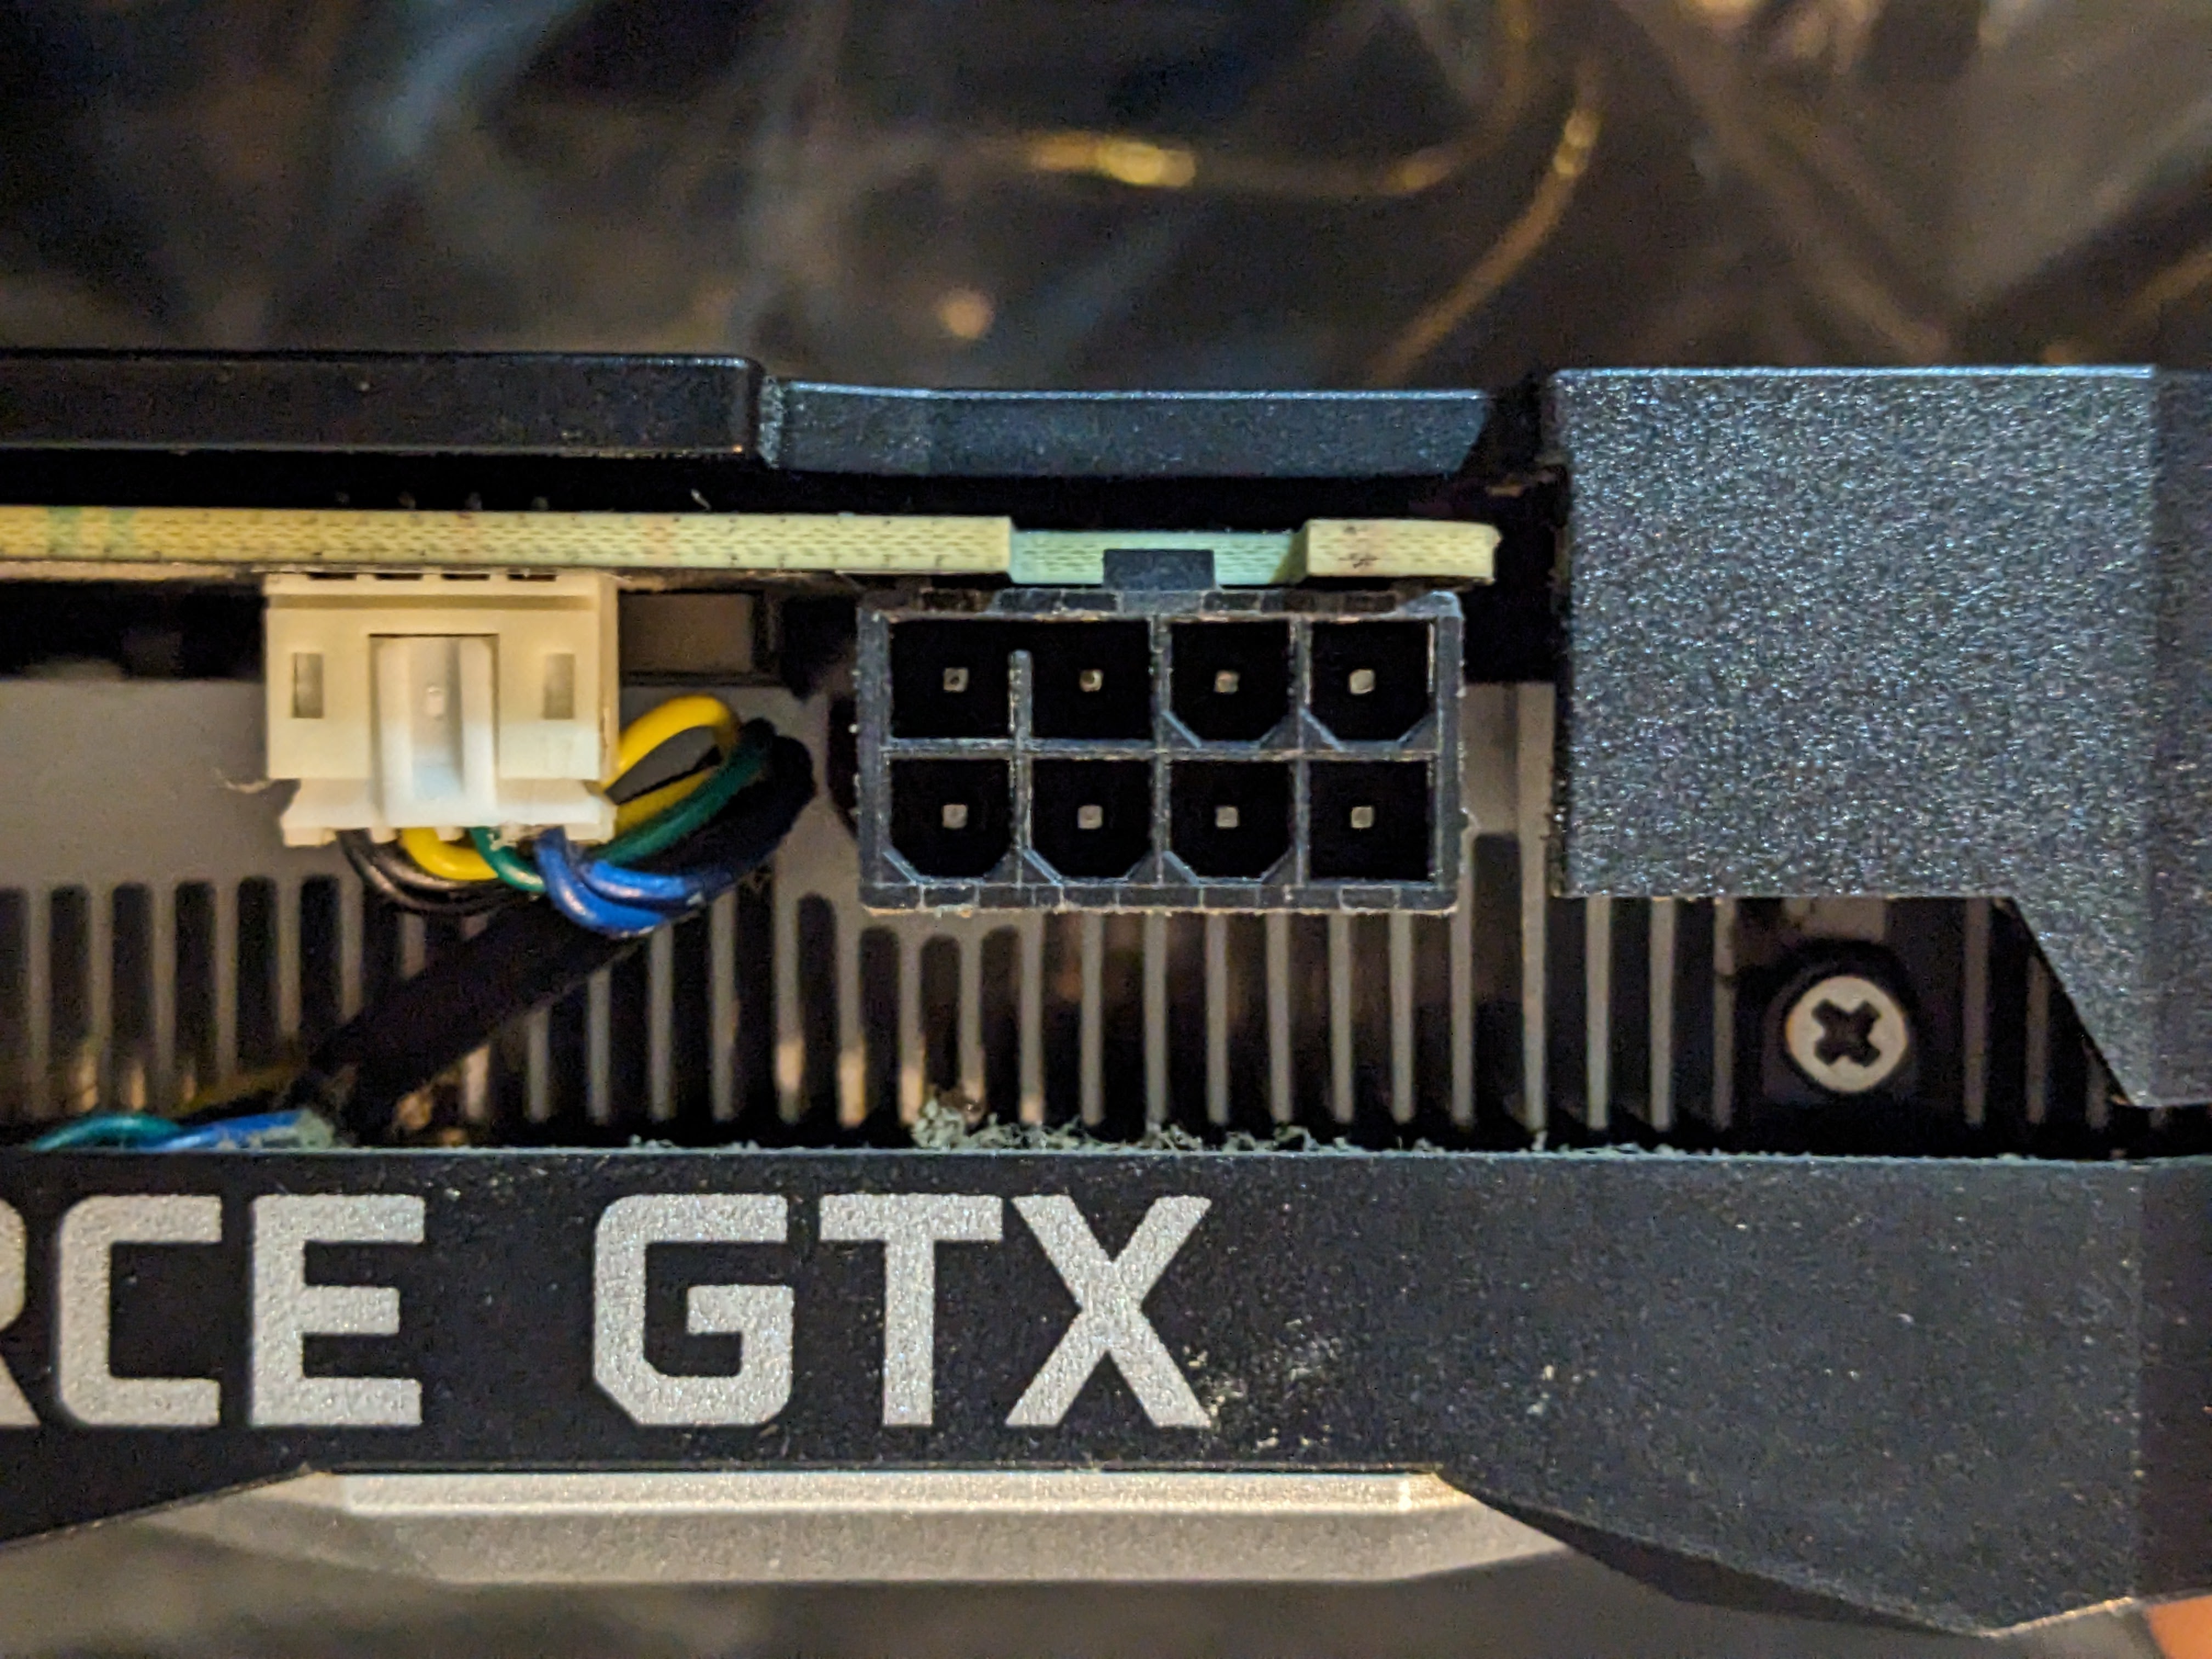
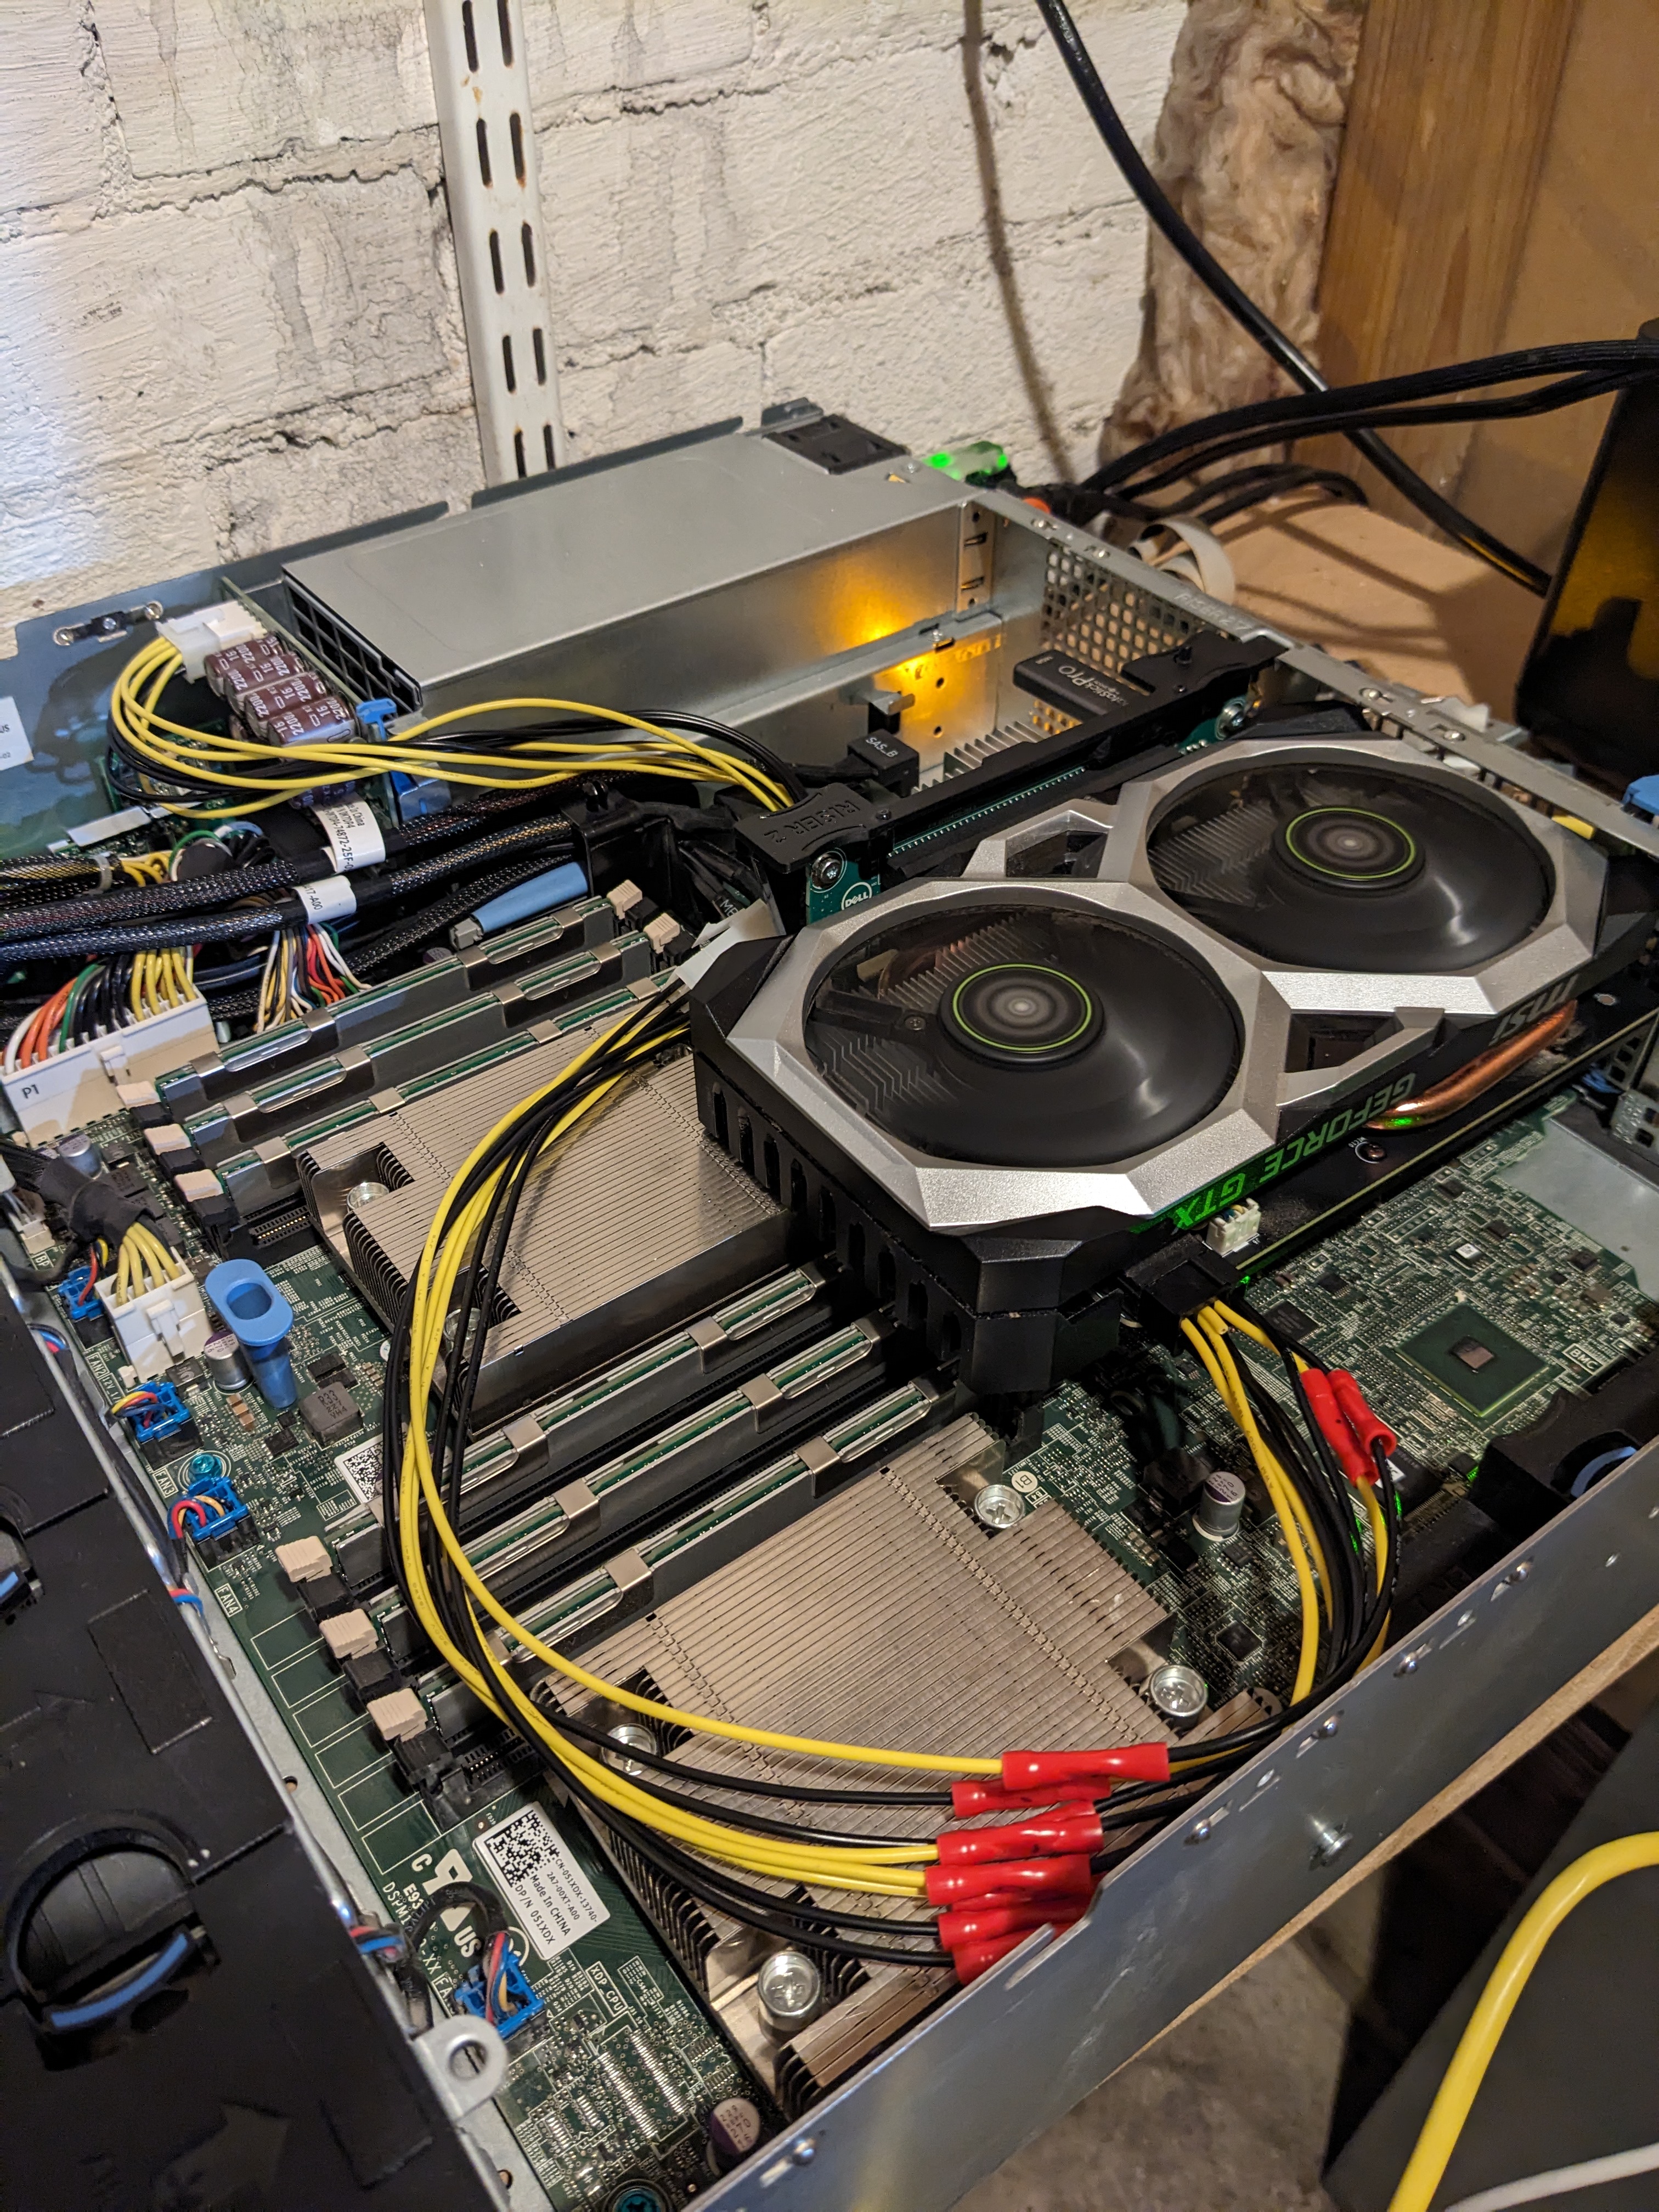 As we can see in the above image, the graphics card and its power cable are successfully installed. Not pictured is a big plastic piece that covers the RAM and processors to better direct the airflow – it won’t fit anymore with this big of a GPU present. Also note how tall the graphics card is. It’s almost sitting on one CPU’s heatsink, while the top is almost flush with the top of the case. Of course there’s no holes in the case for the GPU’s fans to get air from, but there’s thankfully a small enough gap between the graphics card and the top case to provide enough airflow.
Aside: Dell’s quick release for pci cards sucks
After the successful power test, I needed to move around some pci cards before closing the case. I quickly found out that the quick release mechanism which slides down over the sides of the pci cards was stuck. There’s some small metal bumps that stick out to provide force on the pci cards to keep them well-seated. Well, this just got stuck on the graphics card, and now won’t loosen. The graphics card was now stuck in the pci slot. After some Googling, it doesn’t seem like anyone else has faced this issue, and brute force wasn’t going to bend this metal bump out of the way. The only thing that breaks is your skin on its sharp metal. I ended up ever so carefully bending the server’s pci riser card out of its slot and the graphic’s cards, cutting part of the case to free one side of the graphics card, then pulling the graphics card free. With this now free, I cut off the quick release mechanism so that it would never happen again.
What a piece of crap.
Nvidia drivers
Now that the graphics card was installed, powered up, and the system would boot normally, it was time to get the Nvidia drivers working. Some context about my Plex setup: it runs in a docker container on Ubuntu server. Part of enabling Plex running in a docker container is to install the Nvidia drivers on the Ubuntu host, as well as the nvidia-container-toolkit package too.
I had hoped that installing these drivers would be easy, but one can dream. It’s painful, especially if your server is headless, and you’re avoiding installing xserver, the basis for window managers.
If you’re going through the same process, I recommend giving the ubuntu-drivers tool a try to install your drivers first. It seems well recommended and documented by Ubuntu, though didn’t come preinstalled in my version of Ubuntu. I didn’t have any success with this method, and instead manually installed a bunch of packages recommended by a sleuth of places online. The following is what worked for me.
I followed the instructions on this Nvidia page to get the nvidia-container-toolkit package installed and configured for both docker and containerd support (since I had both installed on my system). Then the following packages installed the drivers, the libs for encoding/decoding, and utils for the nvidia-smi tool.
$ sudo apt install nvidia-dkms-535-server libnvidia-decode-535 libnvidia-encode-535 nvidia-utils-535
A reboot later and the nvidia-smi command, a way to see the status of any Nvidia GPUs on the system, showed that the graphics card was working. If this wasn’t showing anything then there’s likely a problem with the hardware or the packages that were installed.
Configuring Docker
Now that the host can see the graphics card, its time to configure docker and the Plex container to use it. The Plex docs and linked docker-specific docs have a good overview of enabling hardware transcoding.
For the normal docker command, the --gpus all flag is all you need to specify. I use the LinuxServer brand of docker images, and their Plex docs recommend a few different options all specified. Those are --runtime=nvidia -e NVIDIA_VISIBLE_DEVICES=all which automatically mounts the GPU and drivers into the container. It seems like the --gpus flag is newer and built in to docker – it might deprecate the --runtime=nvidia method. I’ll stick with what LinuxServer recommends until they change. I use docker-compose to manage Plex for me, so the command line options to run Plex on docker are slightly different and defined in yaml files.
Configuring Plex
At this point, recreating the Plex container should expose the GPU to Plex. Following the Plex docs on enabling hardware transcoding should make it so that any transcoding that Plex needs to do will use the GPU instead of the CPU. In the Transcoder settings section you should also see your graphics card present in the Hardware Transcoding Device dropdown.
Now go and try transcoding a video on your TV or phone. Avoid trying it out with the Plex web UI, there’s a history of transcoding issues that myself and others are facing. You should be able to successfully transcode 4k videos to different resolutions without breaking a sweat. Running the nvidia-smi command on the host should show that a Plex process is using the GPU.
 Here’s what I have set for my transcoding settings. Plex has these configuration options well documented. I’ve noticed that the Transcoder Quality option can be set to its highest and still perform completely fine without exhausting my GPU and CPU. I don’t have many concurrent videos being streamed, so I haven’t been able to bottleneck this setup.
Configure Plex to use a ramdisk for temporary transcode files
One of the quick and instantaneous speedups to watching a transcoded video was switching over the Plex temporary transcode directory to be /dev/shm – Linux’s temporary filesystem stored in memory. When set to nothing, it uses the default Plex application support directory. I had to expose /dev/shm to the docker container for this to work, as the container doesn’t come with it by default, and update the setting in the Transcode settings page in Plex. After this was enabled, I immediately noticed it was much quicker to seek forward and backwards in a video being transcoded. Almost as if the video wasn’t being transcoded at all!
Transcoding for Plex web issue
As mentioned earlier, myself and others have had a lot of difficulty watching transcoded videos when using the Plex web UI. Transcoding works perfectly everywhere else. There’s comedically long Reddit and Plex forum posts to help debug this exact issue, and its still going on. I haven’t been able to find a fix, but it’s likely on the Plex web side of things. Hopefully the Plex developers will be able to fix this.
Instead of starting a video, then switching the quality over to a transcoded version, there is a workaround for starting a video at the necessary transcoded resolution. I’ve had this work, but it’s a pain.
GPU load testing
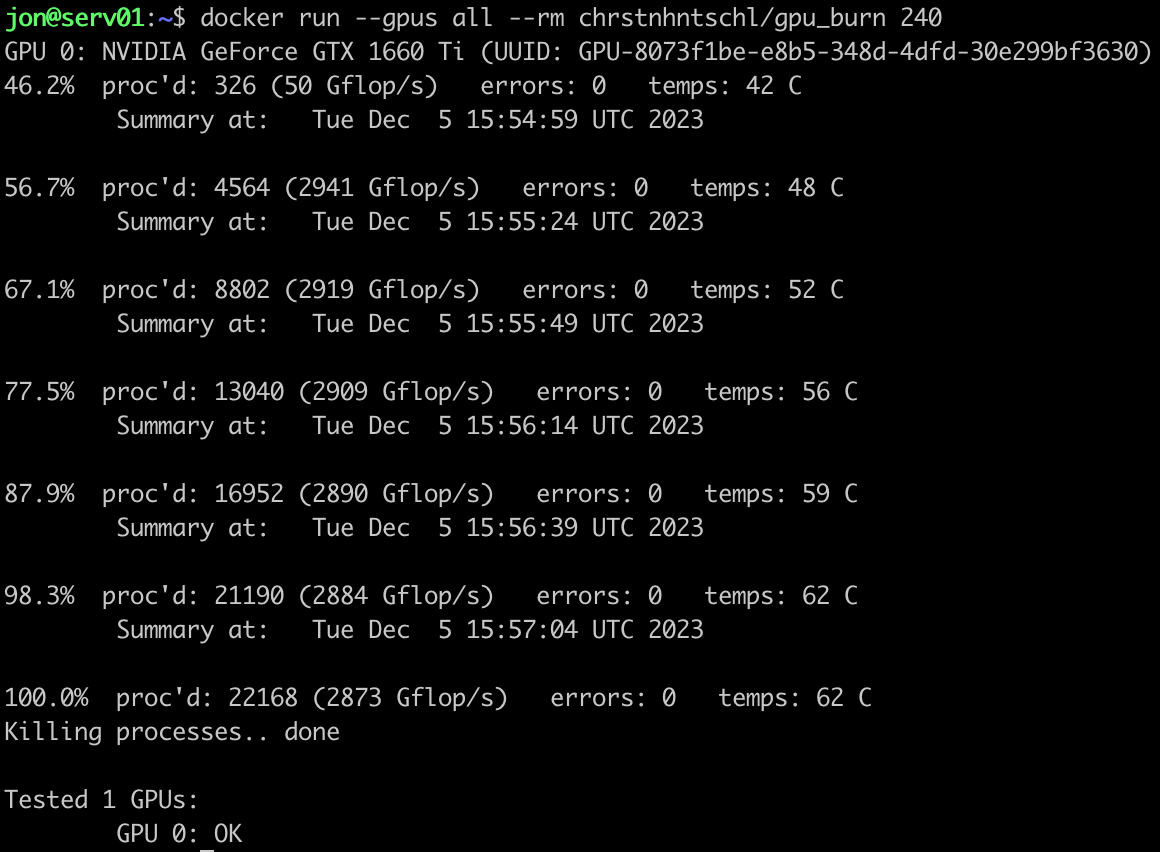
As a fun last thing to do, there’s simple tools out there to stress test your GPU over a period of time. I came across the wonderful gpu-burn project which provides a easy way to stress test your GPU. Someone has created a pretty popular docker image that can easily be pulled to run this command. It can be run via a
docker run --gpus all --rm chrstnhntschl/gpu_burn 120
where 120 is the number of seconds to run the test for. I found that running the test for 10 seconds or less didn’t actually provide enough time for the test to start up and run. Running it for a few minutes or more is best.
 In my case, Plex would only take up around 600 MB of GPU memory when transcoding a 4k video, and would take up less than 10% utilization, with power staying around 25w and thermals around 30 celsius.
As I’m running the stress test, I’m keeping an eye on the output of nvidia-smi. It really does stress your GPU to the max. I was seeing most memory being used, 100% utilization, 100% power usage, and thermals around 60 celsius. Not so bad for a consumer GPU jammed into a server with a handmade power cable. After the test I noticed the temperature gracefully decreasing all the way down to 22 celsius – that’s a testament of decent airflow design in the server. I’ll likely never see the GPU being utilized this much, but it’s good to know that the server can handle it.
Conclusion
My use case of having an enterprise-grade Dell server run a consumer-grade GPU for Plex transcoding ended up turning into quite a longer journey than initially thought. I would not have expected some things such as the graphics card getting stuck in the case, or building my own power cable, but there’s some constants in technology such as drivers always being troublesome, or software bugs lurking around the corner.
Time to go enjoy the fruits of my labour.